
Construct contour lines using AutoCAD
Before we took a look at exporting data to Excel using Softdesk, now let's see how to create level curves, the process in Civil3D has been simplified but usually has the same logic that I will explain from my old CAD Topography manual.
1. Drawing of elevation points
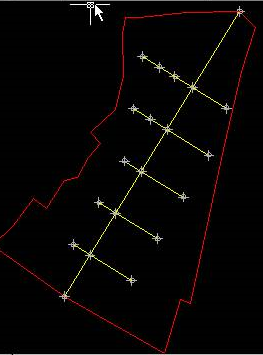 The survey that I have done in the terrain has a central axis where I have taken as a base line each 50 meters, in these points I have taken the elevations and then I have taken views to the right and left depending on the irregularity of the terrain. I have also taken the elevations of the vertices of the polygonal. The drawing of this is done in normal AutoCAD, simple drawing of lines, using circles and points at intersections. Since Softdesk 8 only worked with AutoCAD 14 I had to save the file as an 14 version to support it in Softdesk.
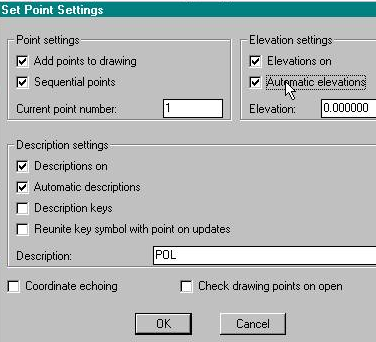
2. Point Settings
- Load Softdesk (AEC / softdesk programs), if you had not done a project choose to create a new one
- Choose cogo, then ok
- Set point style (Points / setup / set points settings)

- Here you have to configure the starting point, and the “elevations on” option, so that you can type them directly on the command line, if you want to add descriptions you can leave “automatic descriptions” unchecked, then we do ok. Be careful, make sure you leave the “automatic elevations” option inactive so that these are entered on the command line.
3. Inserting points
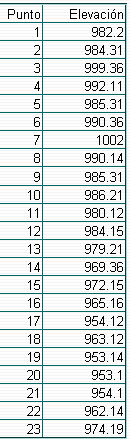
- For this we choose the points/set points/manual option then insert each point, noting the elevation on the command line. If you have points in 3 dimensions or brought from a total station, you can leave the “automatic elevations” option inactive and just click on them with the active snap.
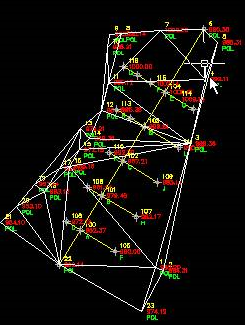
- The points on the right are the 23 vertices of my traverse, and they will carry the automatic description “pol”

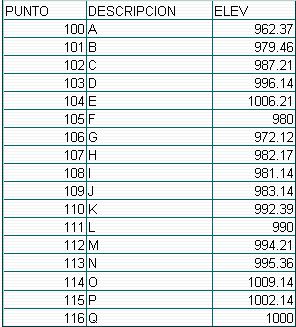
- Now I enter the internal points, which have a different nomenclature, for this I deactivate the "automatic description" and enter a description each time we place the points

4. Outline Creation
- To do this select AEC / softdesk programs / DTM / ok
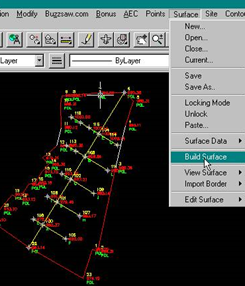
- Now create a surface to assign to this the points, select surface / new / add name / add description / ok
- To add the points entered to the created surface, we will start by creating the contour, so select surface / surface data / standard faults / by point number
- Enter in the command line the points included in the traverse in this way 1-23, then to close we repeat the 1
- then enter, name the perimeter and enter again
5. Triangulation (Digital Terrain Model or MDT)
- To do this select surface / build surface / choose both the faults, contour and points options inactivating zero elevations
- then we do ok, enter, Yes to see the triangulation and then enter
- Our drawing should look like this:
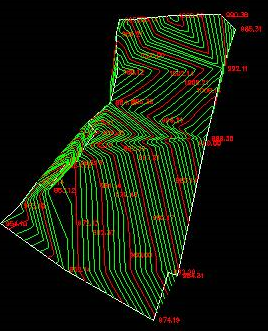
6. Creating Level Curves
- Turn off all the layers you do not want to see at the moment
- Configure contour features by selecting contour / contour properties and enable the following options:
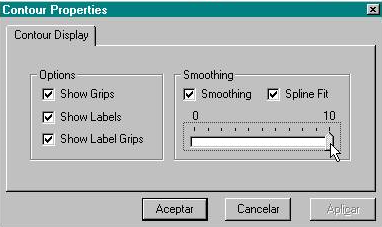
- Now we create the curves with the option contour / create contour
- We chose the interval of main and secondary curves, we will use the main ones each 5 meters and the secondary ones each 1, also we choose the name of the layers
- Then we do ok, and enter
- When you change the colors to the layers, you have to keep the work in this way.
In other links we see how to make contours with Civil 3D, Google Earth, Bentley Site, Manifold GIS, ArcGIS.


In life is never free
This article explains how to do contour lines using CivilCAD
http://geofumadas.com/crear-curvas-de-nivel-con-civil-cad-a-partir-de-datos-de-estacin-total/
I have civilcad 2008 for autocad 2011, please tell me how to draw contour lines in this program
how can I generate curve of levels with the program autocad land 2011
This program I do not think is already available. AutoDesk has released Civil 3D that does something similar, and perhaps the most practical and accessible is CivilCAD, which is a product created in Mexico and runs with almost any version of AutoCAD.
Good! Until very recently, I knew perhaps about contour lines, having seen them on cartographic sheets, but today I feel satisfaction because I have learned to create them, very grateful for what they publish here, I visit this page as many times as I can, since here the Internet gives a little bit of a can ...
I would like to have this program and have more information double the handling step x step how much it costs and where they inform me about courses of profiles, curves, etc.
mmmm I think they have to update themselves there is the civil cad and in spanish civil eye cad is not civilcad 3d that is another program the best one I would say
There are versions of Civil 3D for each version of AutoCAD, such as 2007, 2008, 2009, 2010, etc.
Does civil work with auto cad 2008?
Very good blogs that comment, thanks for the information and hope that continue exposing these topics that are of much use the site is very buenisimo
this program is for the 2008 autocad version
I want to know about this program is very interesting I am new. thank you for your tolerance.
I want to know about this program is very interesting I am new.
mmm, it should be possible to do with gvSIG 1.9
but, I do not know, sorry to insist but there is some free application to do this